Accessing Datasets
OSN supports a RESTful API that is compatible with the basic data access model of the Amazon S3 API. Any software that complies with that API can access data stored on the OSN.
There are three common methods for connecting to and using OSN resources:
OSN portal built-in web tools
Third party desktop applications (e.g. Cyberduck, Rclone)
Third party data management server applications (e.g. Globus and iRods)
OSN Portal Built-in Web Tools
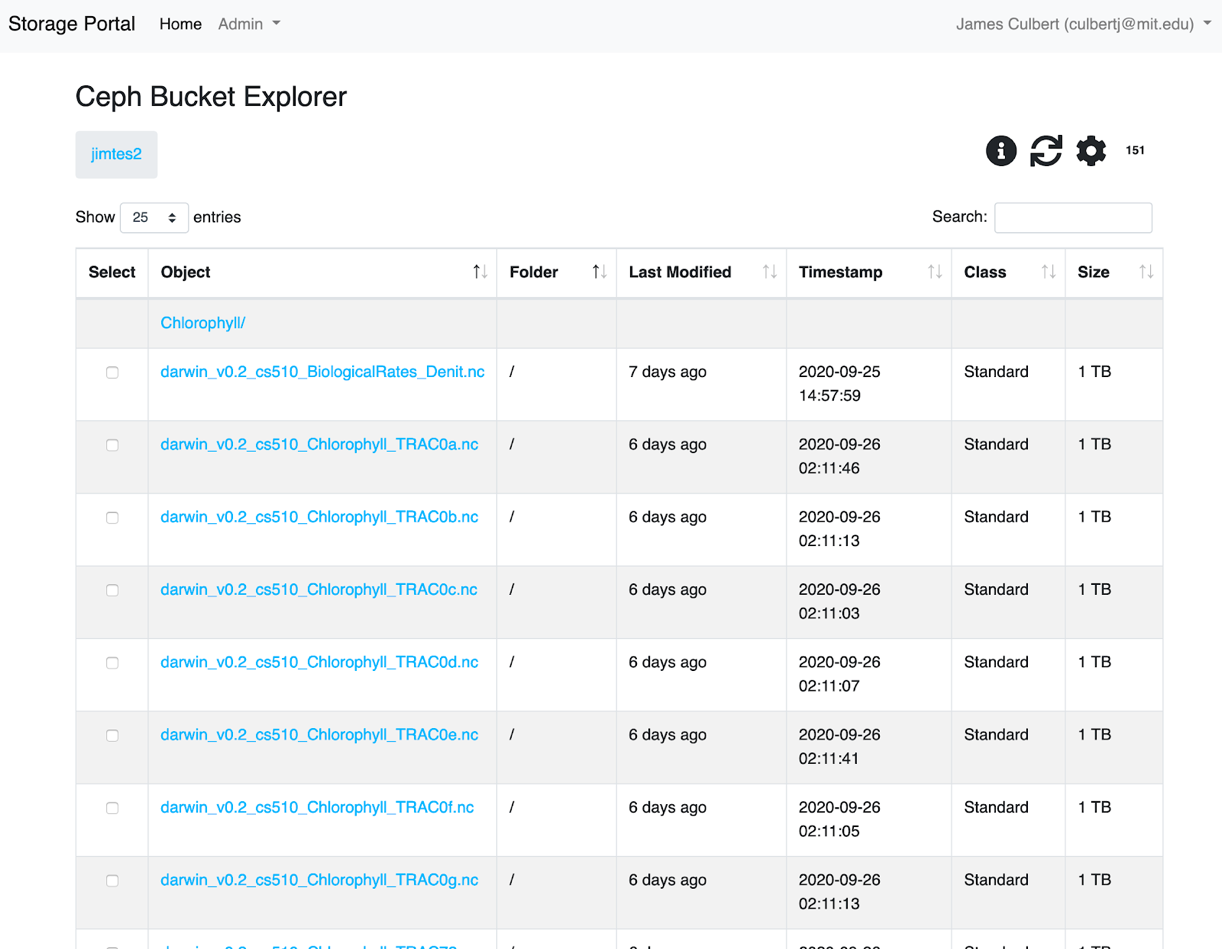
The OSN portal (portal.osn.xsede.org) supports a simple UI that allows end users to browse allocations and to upload and download objects via the browser. This mode of access is most appropriate for browsing a dataset and uploading/downloading smaller files (typically <100G).
To use the built-in browser, a user logs onto the OSN portal and clicks on one of the allocations that they have been granted access to. This brings the user to a searchable/sortable table listing of the allocation and its subdirectories. Clicking on any of the objects shown initiates a download of the object to the local disk.
To upload a file, the user locates the file on their local filesystem and drags the file to the browser window. This initiates an upload to the bucket location that the user is currently browsing.
OSN Basic Bucket Browser
OSN Basic Bucket Explorer
Third Party Applications
There are numerous commercial and open source software tools for moving files to and from S3 buckets. These tools provide more sophisticated capabilities than the built-in browser tool including transfer management, multi-upload management, and provide configuration options that can help optimize data transfer for a given computer/network environment.
To use these tools, you will need to retrieve a pair of keys that are used to access the buckets stored on OSN. To retrieve these keys, you can contact your data manager and she will either give you keys or create an account for you on the OSN portal where you can retrieve these keys. If your data manager creates a portal account for you and gives you access to the keys you can visit OSN Portal to retrieve them; the allocations you have access tto and their associated keys will be listed on your home page.
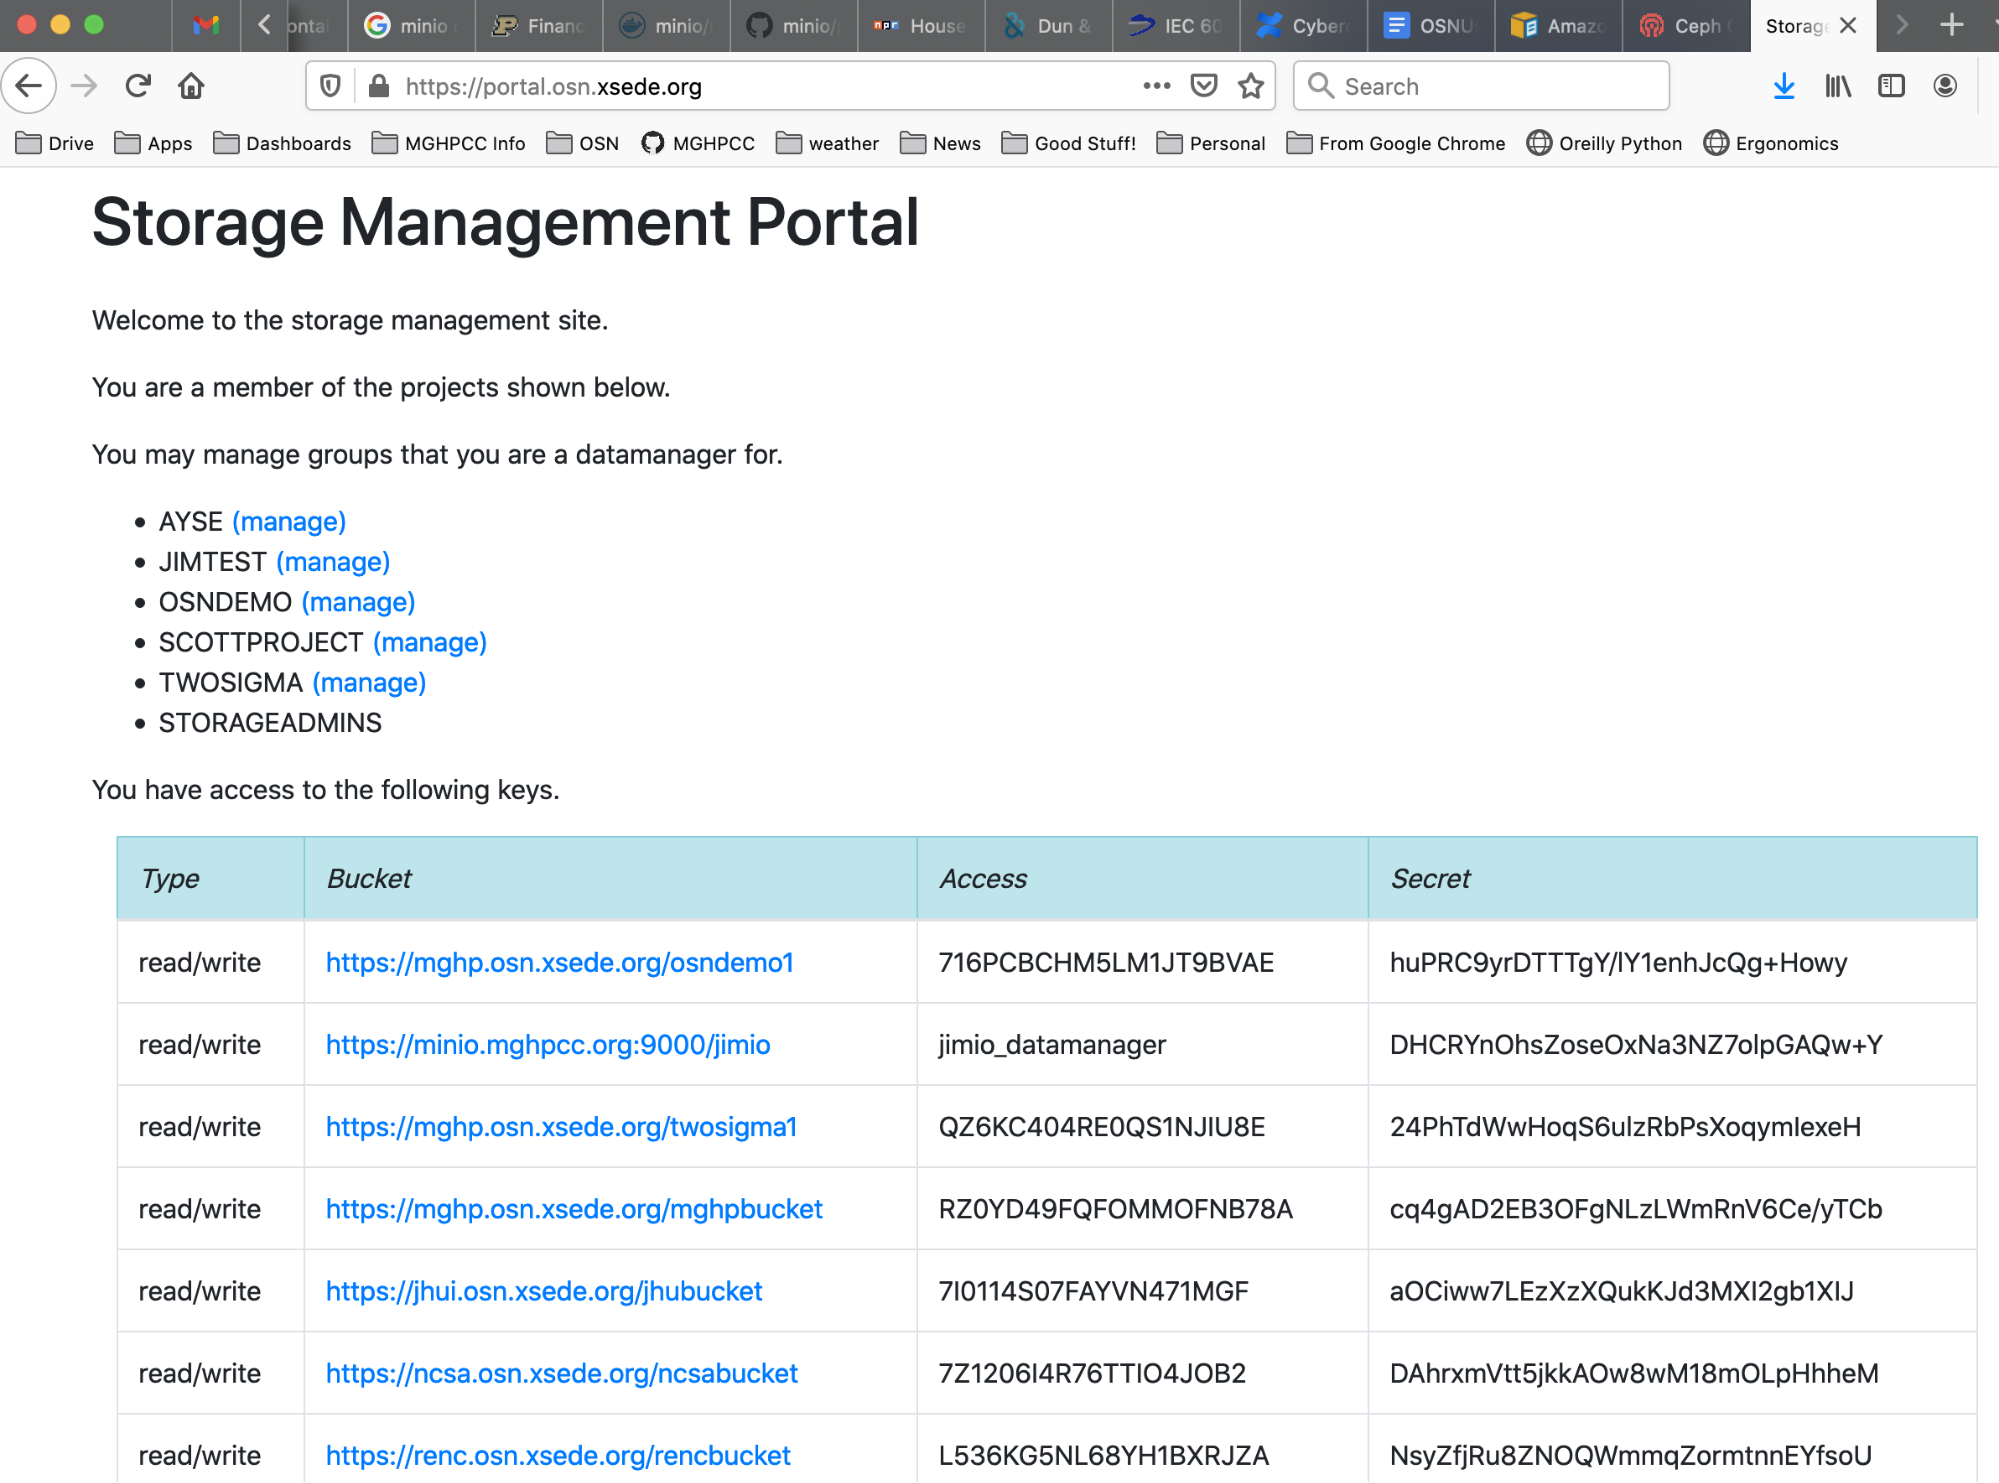
OSN Portal User Home page
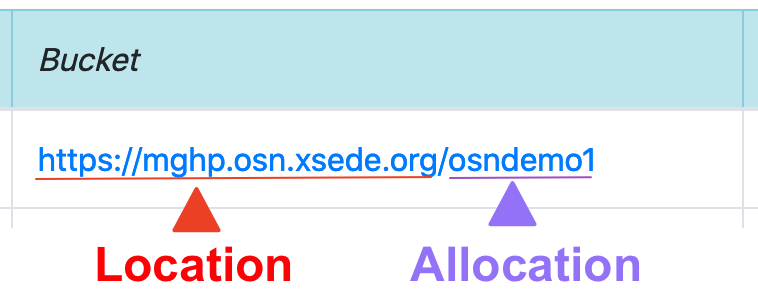
Note that the “Bucket” information displayed in the portal has two components (this will be important when you configure third party tools). The bucket information contains the OSN site/pod location and the specific allocation on that pod.
Cyberduck
Cyberduck is a popular file transfer tool that supports the S3 API. The following describes how to configure Cyberduck to connect to an OSN resource. Cyberduck is a “cloud storage browser” for Mac and Windows that supports multiple storage providers/protocols. The software may be downloaded at: The Cyberduck Download Page
Using Cyberduck with OSN is straightforward.
Visit the OSN portal to retrive your Bucket location and allocation names (see image below)
Visit the OSN portal and retrieve your allocation keys or retrieve them from the data manager for your project
Open Cyberduck and select the bookmarks icon (see image below)
Click the add icon at the bottom left of the screen to create the bookmark
Edit the new bookmark to point at the desired OSN pod using you allocation key pair
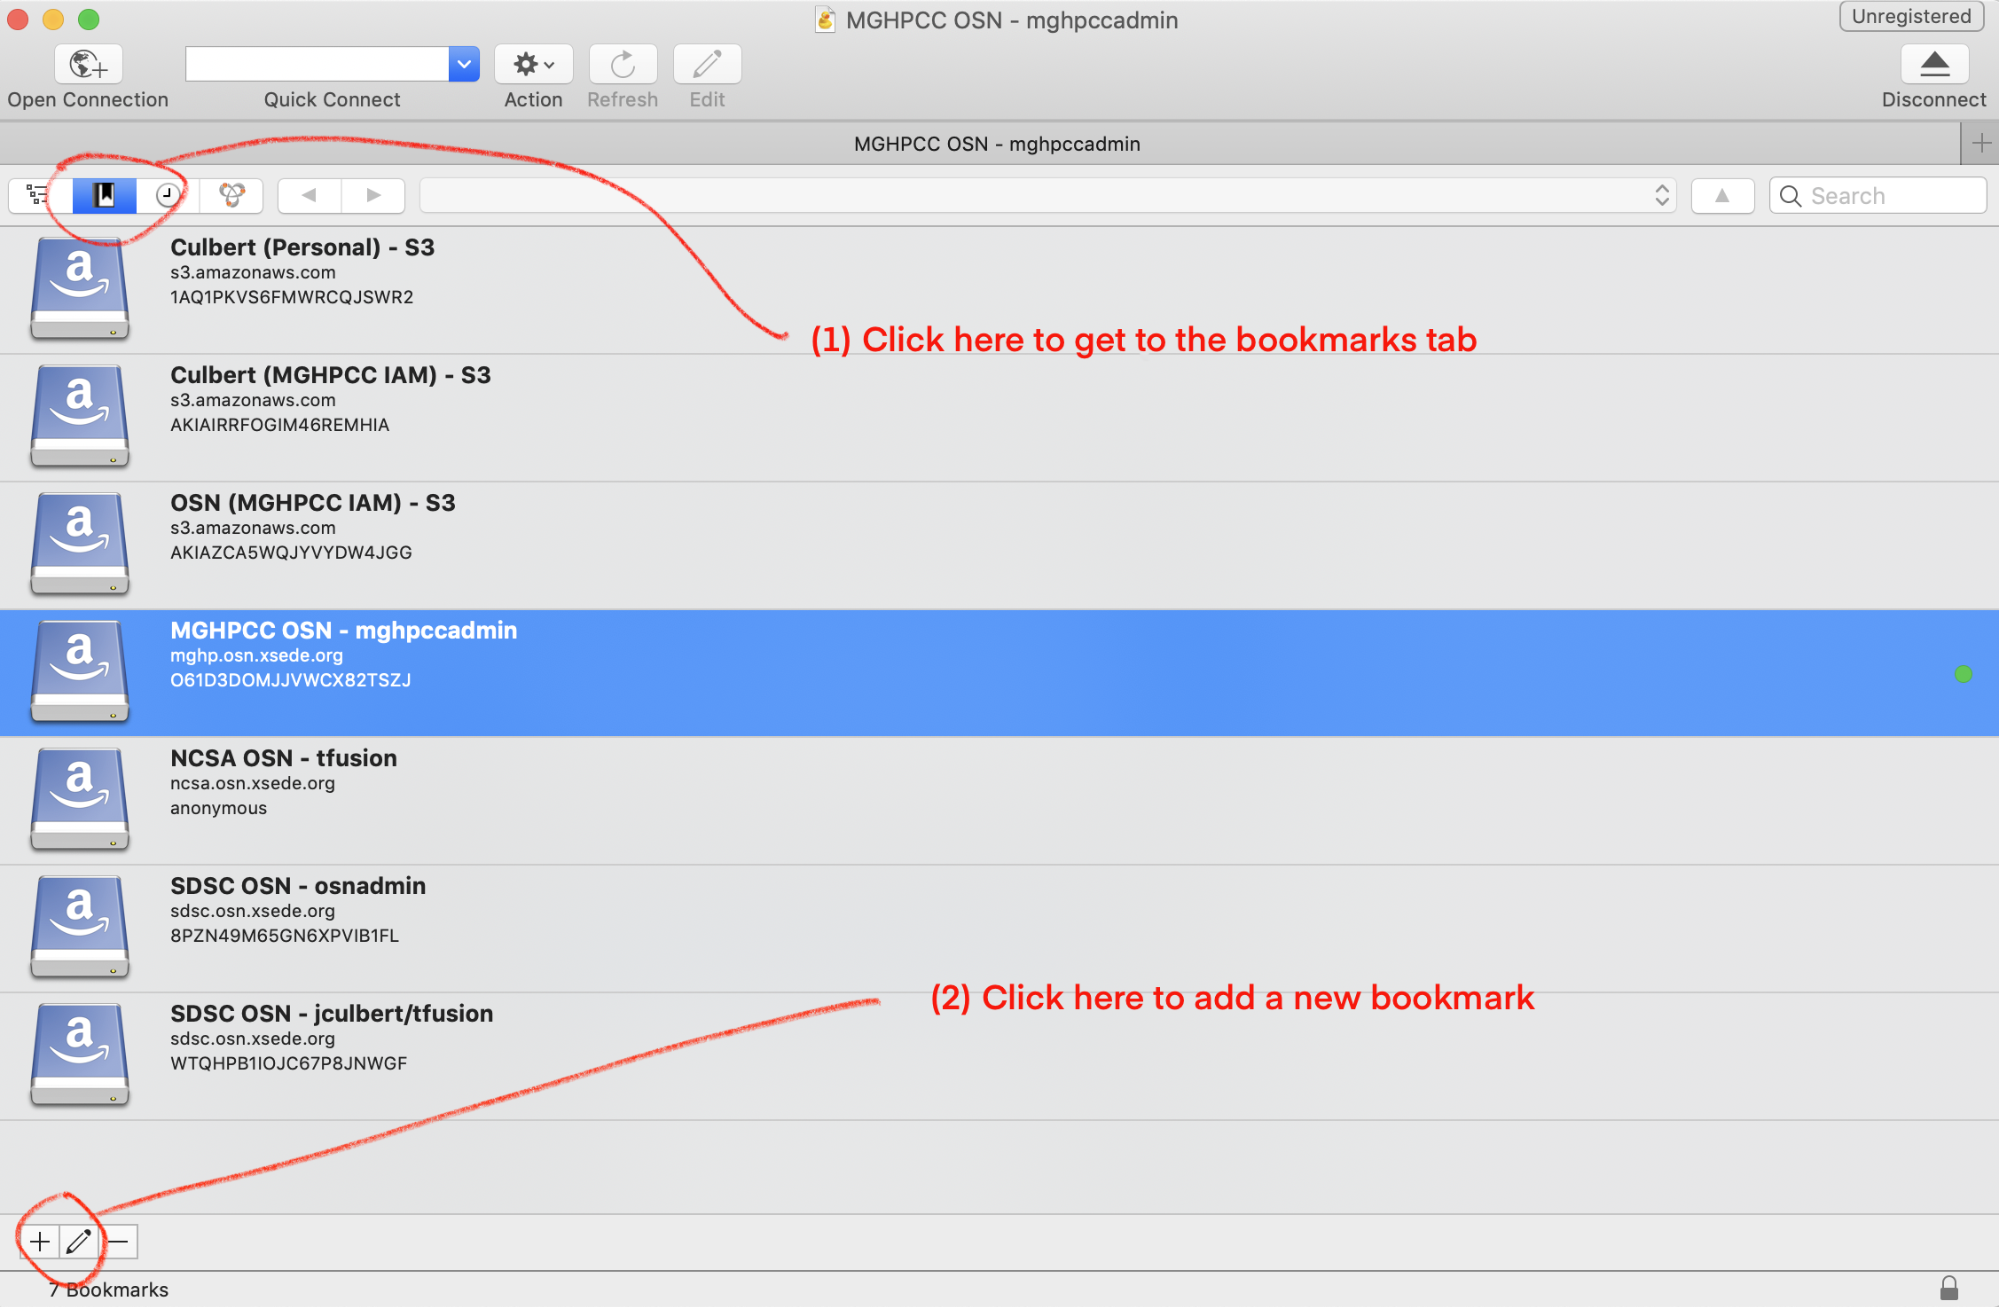
Selecting the bookmarks page and adding new bookmark
When specifying the server, use the hostname portion of the location (i.e. if the location is https://mghp.osn.xsede.org the hostname is “mghp.osn.xsede.org”).
When specifying “Port”, use 443 if the location starts with “https”; use 80 if the location starts with “http”.
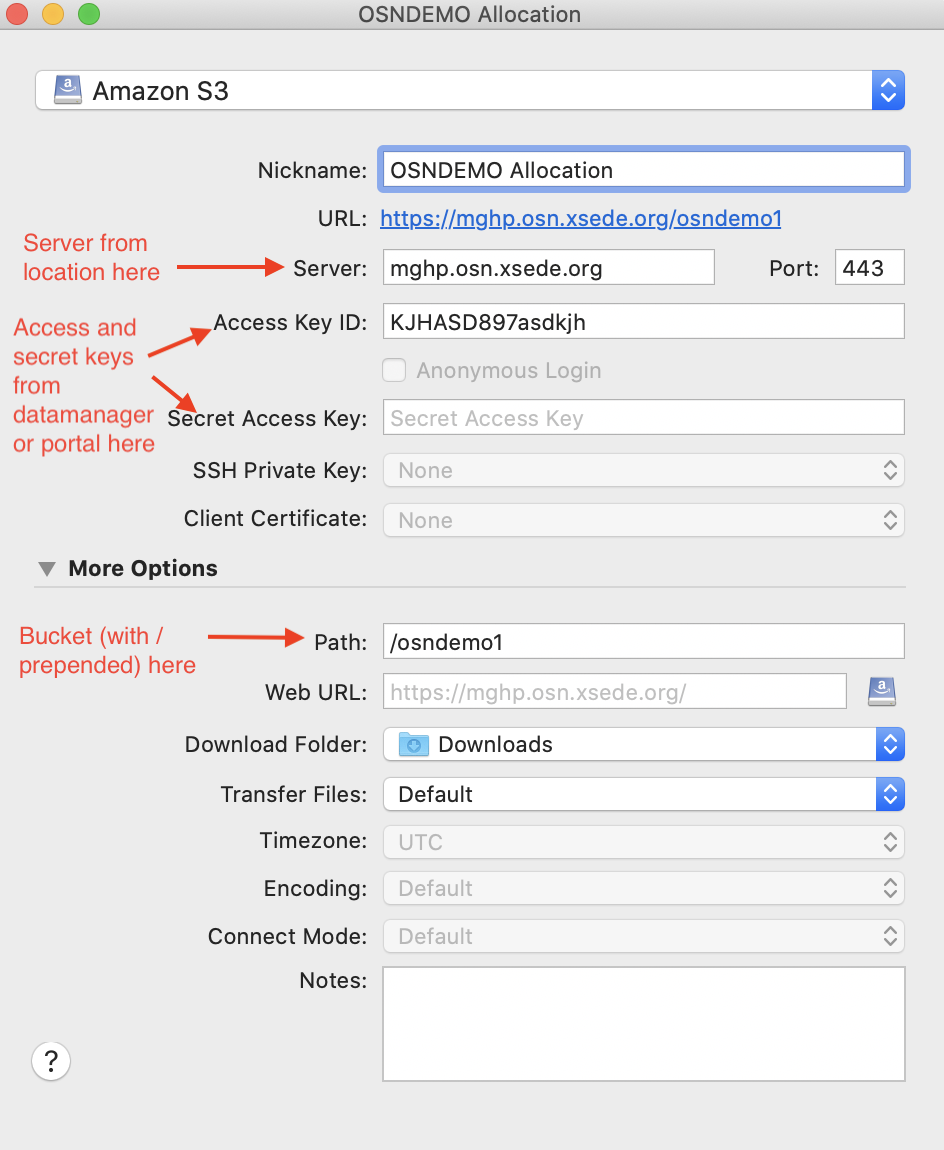
Adding OSN pod and user information to bookmark
Anonymous Access Data Sets
Some datasets provide anonymous read access; if you are accessing buckets anonymously, type “anonymous” into the Access ID portion and Cyberduck will then select the grayed out anonymous access box in the window.
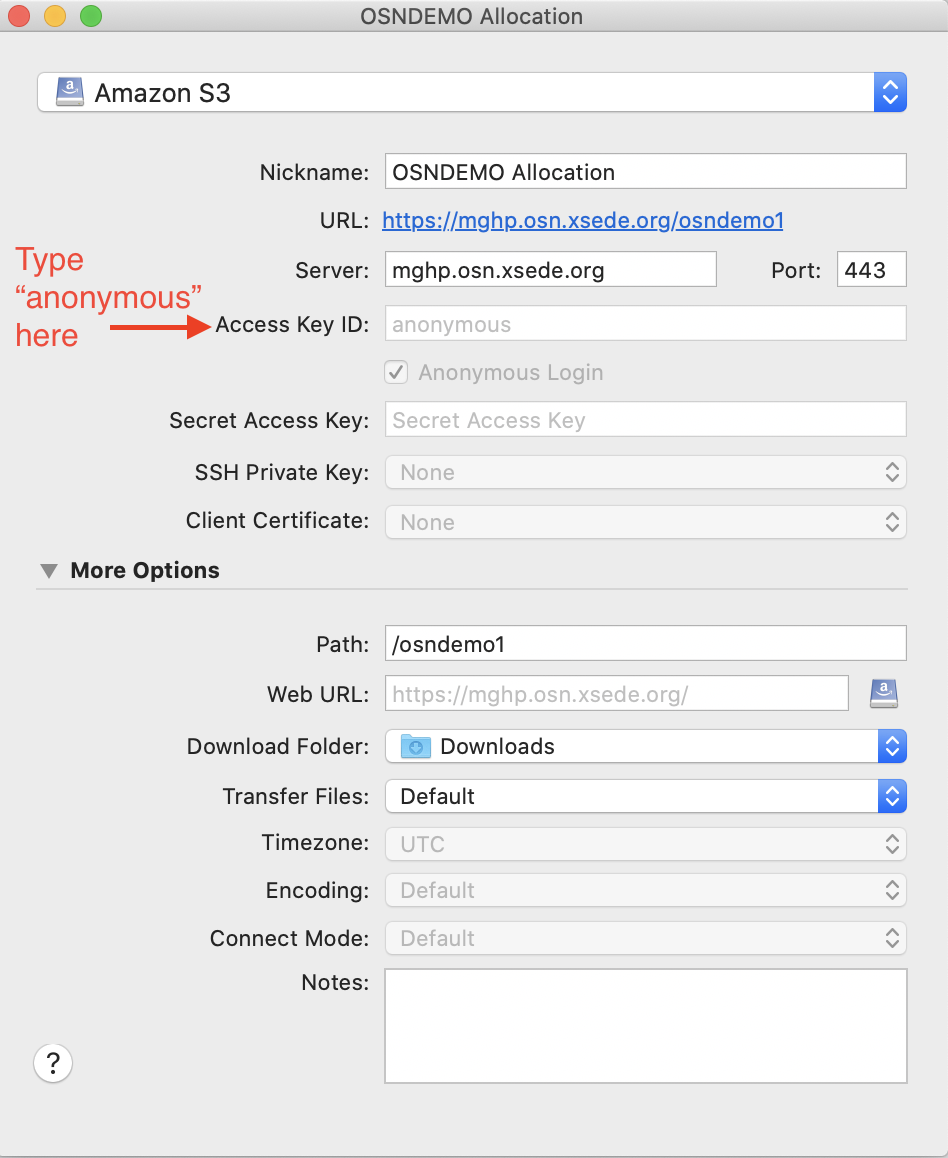
Using anonymous access as your user
Exit the window for the bookmark to save.
Browsing, Uploading, and Downloading
Once a bookmark is created, you can use it to access data by double-clicking the bookmark. This logs your user in and lists the contents of the dataset.
Note: If your buckets have large object counts, you will need to increase the Timeout settings for connections.
Go to Preference > Connection and change the box next to Timeout for opening connections (seconds) and change the setting to 90 seconds.
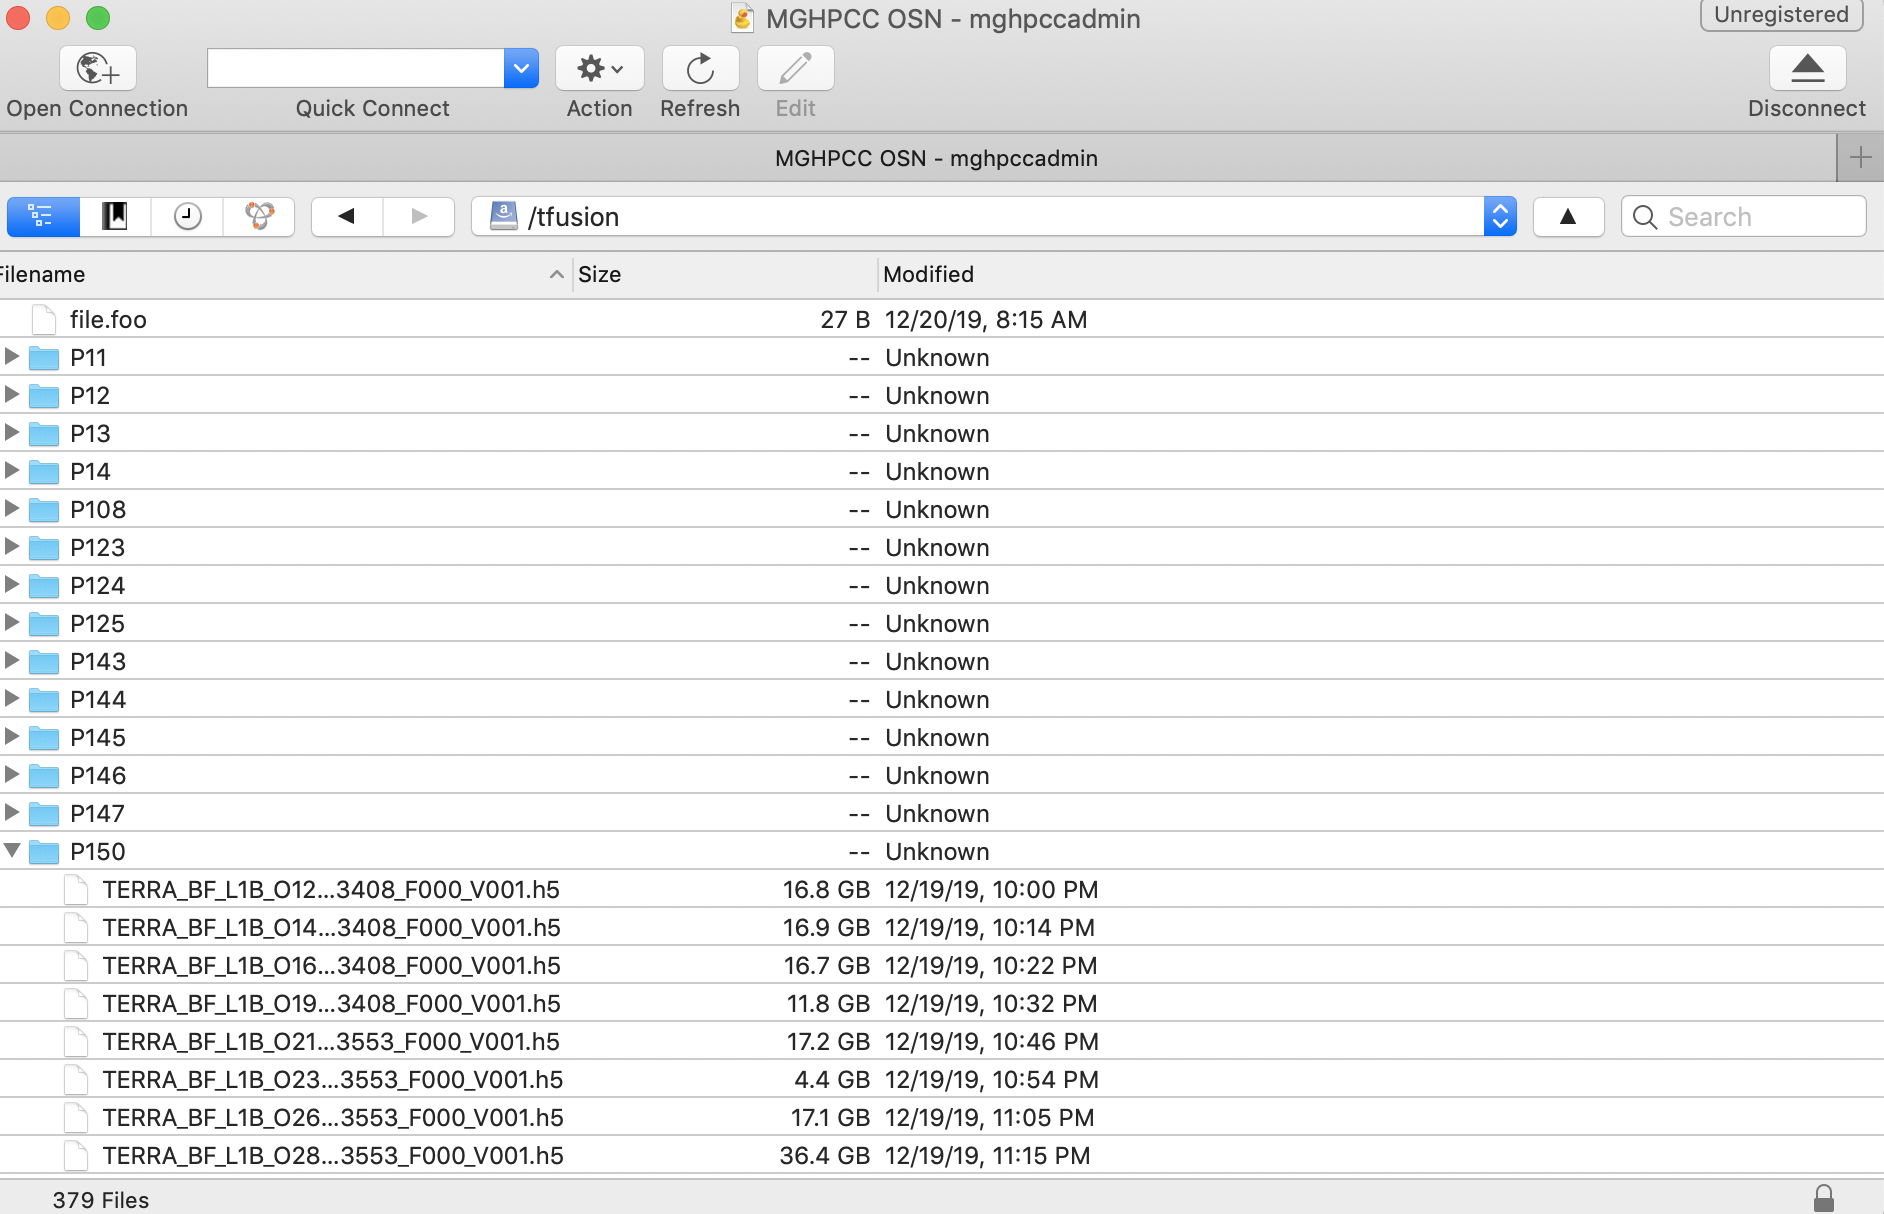
Directory listing within bucket
Cyberduck client is a full-fledged transfer client so desktop up/downloads can be easily performed for data sets.
The tool supports multiple upload/download streams, chunking, pausing and restarting.
Rclone
Rclone is a CLI program to manage files on cloud storage. It’s similar to rsync but provides many additional features including support for over 40 cloud storage products.
macOS installation
Install Rclone via Homebrew
Homebrew is a 3rd party package manager for macOS that can be used to easily install many FOSS packages. To install Homebrew, please see the documentation on their website or simply run the following command:
$ /bin/bash -c "$(curl -fsSL https://raw.githubusercontent.com/Homebrew/install/HEAD/install.sh)"
Once Homebrew is installed, install rclone by running the following command:
$ brew install rclone
Install Rclone without Homebrew
Alternatively, you can install rclone for macOS by running the rclone-provided install.sh script which will download the relevant precompiled binary.
$ sudo -v ; curl https://rclone.org/install.sh | sudo bash
Linux installation
Installation of rclone for Linux can be done using your Linux distribution specific package manager, or by using the rclone-provided binary installer.
Note, if you are on a system where you do not have administrative privledges, see the last section of the Linux installation documentation on non-privledged installation.
Install Rclone using Linux package managers (requires root access)
For RedHat or RedHat clone distros:
$ sudo dnf install rclone
For Debian-based distros including Ubuntu:
$ sudo apt install rclone
For Arch-based distros:
$ sudo pacman -S rclone
Install Rclone binary directly (requires root access)
Alternatively, you can install rclone for Linux by running the rclone-provided install.sh script which will download the relevant precompiled binary.
$ sudo -v ; curl https://rclone.org/install.sh | sudo bash
Non-privledged installation of Rclone on Linux
If you are on an HPC system, first check to see if rclone is already installed. For instance, if you are on a module-based system, you might search for the rclone module.
$ module spider rclone
If it is available, then you can module load rclone and then follow
the rest of this documentation.
If rclone is not available on your HPC system, you can install it into your $HOME directory. First, fetch and unzip the precompiled rclone binary.
$ curl -O https://downloads.rclone.org/rclone-current-linux-amd64.zip
$ unzip rclone-current-linux-amd64.zip
$ cd rclone-*-linux-amd64
Place it in a directory that you have write access to and is in your $PATH. If one is not available, you can create one.
$ mkdir $HOME/bin
$ cp rclone $HOME/bin
$ export PATH=$PATH:$HOME/bin
$ echo export PATH=\$PATH:$HOME/bin >> ~/.bashrc
Note: The export and echo commands are for bash and other bourne-compatible shells.
Windows installation
For Windows installtion, download the correct binary for your system. If you are not sure, use the first download.
Once downloaded, open the file in Explorer and extract rclone.exe. Rclone.exe is a portable binary and you can place it anywhere that is convenient to call from CMD or powershell.
Rclone Configuration
The most straightforward way to configure Rclone for OSN is to edit the rclone configuration file. This file may be found by typing the command “rclone config file”. The command will return the path to the rclone config file. Open this file with a text editor and add the following stanza to the end of the file:
[<alias>]
type = s3
provider = Ceph
access_key_id = <access key>
secret_access_key =<secret key>
endpoint = <location>
no_check_bucket = true
Where: * <alias> – nickname of your choice for the allocation * <access key> – the access key from the data manager or from the portal * <secret key> – the secret key from the data manager of the portal * <location> – the URL provided by the data manager or portal without the bucket
An example of a configuration stanza might look like:
[ocean-data]
type = s3
provider = Ceph
access_key_id = ASasd8KJHDAKH**&asd
secret_access_key =asd(*&Adskj*(*(&868778
endpoint = https://mghp.osn.xsede.org
no_check_bucket = true
Rclone Commands
Rclone commands are of the form:
$ rclone command alias:/bucket
So, using the example config file entry described above and assuming a bucket named “phytoplankton”, one would list the content of the bucket using the following command:
$ rclone ls ocean-data:/phytoplankton
You could copy a local file to the bucket with the command:
$ rclone copy my-local-file.dat ocean-data:/phytoplankton
Rclone offers a wide range of commands for performing typical unix file operations (ls, cp, rm, rsync, etc.). Details on these commands can be found on the RCLONE documentation page.
AWS CLI with OSN
Install the AWS CLI utility:
Official instructions to install the lastest AWS command line interface
After installing the AWS CLI, create a “config” file, ~/.aws/config,
with
[yourprofilename]
output=json
and add a corresponding credentials entry in your “credentials” file,
~/.aws/credentials, with
[yourprofilename]
aws_secret_access_key = your_secret_key
aws_access_key_id = your_access_key
Your profile name is the one listed on the OSN storage page, with project ID+name. For example:
XYZ123415_Bob_Smith
After loading your aws-cli environment, you can use s3 commands such
as:
aws s3 ls <yourbucket> --profile <yourprofilename> --endpoint <yourendpoint> --recursive --human-readable --summarize
Recall that if a bucket url is https://mghp.osn.xsede.org/phytoplankton, then <yourbucket> is phytoplankton, and <yourendpoint> is https://mghp.osn.xsede.org.
Third Party Data Management
OSN users may also choose to layer more sophisticated data management applications on top of the S3 API services that OSN provides. Two applications that have been used with OSN include Globus (using the Globus S3) connector and iRods. Both packages have detailed descriptions on how to connect the service with a S3 storage provider.
Globus with OSN
OSN does not provide a Globus instance. You must provide your own. In order to use Globus with OSN, you must have the AWS Web Services S3 Connector installed and configured in your Globus instance.
After installing the Globus Connector, you can run the following commands to configure your OSN bucket as a Globus collection.
Create a storage gateway:
$ globus-connect-server storage-gateway create s3 collection_name --s3-endpoint https://site.osn.xsede.org --bucket bucket-name --s3-user-credential --domain your.globus.domain
Find the Storage Gateway ID:
$ globus-connect-server storage-gateway list
Create a Globus collection:
$ globus-connect-server collection create 12345678-9abc-defg-hijk-lmnopqrstuvw / "collection_name" --organization "Name of your Organization" --contact-email youremail@your.domain
where the string 12345678-9abc-defg-hijk-lmnopqrstuvw is what is returned by the “Find the Storage Gateway ID” command.